The making of an all electric EV VW Cabriolet

This blog follows my process of converting a 1992 VW Cabriolet to an electric vehicle. As an EV it is quiet, dependable and has plenty of pep and range to get around town.

Tuesday, September 08, 2009

All the better to see you with

And now to start catching up for the last two and a half years - somewhat chronologically:

To watch the batteries a little better I added a red LED digital volt meter. It's bright enough to read except in bright direct sunlight, and matches pretty well with my handheld meter. I'll get a much better read on the batteries now, and can watch them in real time. The meter updates a few times a second.

The good is that its:

-cheap
-bright
-isolated power and sense pins

The bad is that it's cheap. I burnt two of them before I figured out that it can't really handle the high voltage leakage paths from the pack to ground. When I hit the accelerator, the meter goes crazy, and in a few days dies with one part burnt off the PCB. After looking at the toasted parts I figured it must be arcing from high voltage to the house ground, and probably due to the noisy voltage spikes when the controller is actively chopping the DC. A $5 isolated 12V-12V DC-DC supply on the 12V power input has fixed it, and it's still running strong two years later.

Tuesday, January 23, 2007

Loooong overdue, but very short, update

I apologize for those who've found this blog and are wondering why it stopped. Before I started my conversion I came across several very complete and informative websites, and several that got started, but left you hanging not knowing if the car got finished or abandoned.

It runs! I've driven the car for about 1100 miles so far over the past several months. There is still work to be done, it's hard to stop driving and call it a project again! My more urgent to-do list:

Install charger - it's sitting on the garage floor right now
Install heater - this is a biggie. I need to tear open the dash and make sure I trust the safety systems I'll have in. It's not Wisconsin cold here in central Texas, but driving a car with no heat when it's freezing isn't a lot of fun. Besides, since it's a convertible and the top inevitably leaks, I need the heater to defog the windowshield.
Install better battery gauges - Right now I only have an ammeter working, which is marginal as long as I don't press the range. In the short term I'm going to install a digital LED panel meter and get the SOC gauge working. Long term I'd like to have something look at each battery, be it active and switching a DMM between batteries, or passive like the red/green LED moniters that can be built for 50 bucks.

But all in all the car is great, I love giving people rides and getting weird looks in parking lots while people try and figure out why my engine is so quiet.

Sunday, July 09, 2006

The front rack is in!

After the last post I promised the steering rack and motor would be in, which is easy if you wait long enough between posts. The manual steering rack went in without too much of a fight and works great now.

About a month ago the local PBS station KLRU asked to come film an EV conversion in progress for a show they were working on which dealt with global warming and alternative energy and transportation options. That episode of Austin Now is available here. It just turned out the Cabriolet was ready to have the motor dropped in. Much grunting and lifting later it was in! Kudos to the Electroauto folks for the motor mount design, it fit really well.

The KLRU crew also got a lot of film of Mark Farver's MR2 cruising around, and got to share a bit of the EV grin when one of the crew got to drive.

The crew left before we got the drive axles attached, but at the end of the night we hooked a battery up to the motor terminals and the wheels spun, even in the right direction! Last week I sat in the driver's seat and powered the motor from my old starter battery hoping to be able to pull forward in the driveway. Grand total of progress: 4 inches! But there was real movement and battery powered. I just need a few more volts to make things happen.

I got the battery rack in place today, I need to make a few pieces that I can't find as part of the kit. Kudos again to ElectroAuto fitting the battery rack in. It was tight in a lot of spots but fit fantastically.

Thursday, May 18, 2006

Smooth running motor

I've spent the last two weeks trying to track down a nasty vibration from the motor. The motor spins by itself very smoothly, has a little wobble with the pressure plate attached, and trys to shake the table apart with the flywheel attached. Must be the flywheel right? It may not be perfect, but it's near what I can do with my calipers. I could do better with a lathe and an indicator, but it was close. It turns out one of the alignment pegs on my flywheel was sheared off and the one peg with the 9 bolts wasn't enough alignment. Thankfully the clutch house had one to replace it with, bolted it up and... it still vibrates, but not as much. Last night I was willing to try anything different and put my old pressure plate on. Voila! Almost no vibration, just a motor revving up silky quiet. There is still a little of the old shimmy, but it's MUCH better.

Now a couple pics:

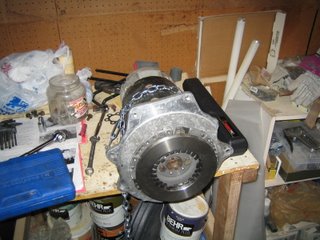
This is a progression of assembling the parts to the motor. The parts are laid out here. Clockwise these are: The 8" ADC motor with spacer ring and taperlock hub already attached, the other half of the taper lock adapter that attaches to the pressure plate, the transmission adapter and the old pressure plate.

Motor with taperlock hub and transmission adapter in place.

Motor with new pressure plate on it, it was so pretty. Too bad it stank.

The full assembly with the clutch and flywheel mounted. Those who know too much about VWs will notice the outer flange of the flywheel is thinner than it used to be. I didn't get too aggresive since I didn't know how it all fit together. I'll drop another couple pounds next time.
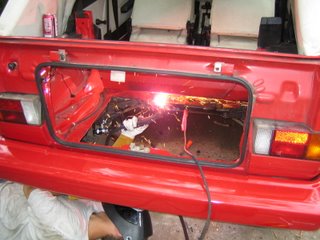
This is me using the best invention since the wheel, which led to pizza delivery. Chris's plasma cutter was a godsend for the cramped spots and weird angles cutting around the cross bracing left me with.
Not to mention it's a lot of fun to play with. It's the one inch light saber as Chris says. These cuts would have taken 5 times longer using a Sawzall.
The rear battery box cutout is almost done at this point!


Next post should have the manual steering rack and motor in the car! Hope springs eternal.

Wednesday, May 03, 2006

Time's been scarce so here's a quick update:
Cutting for the rear battery box started last Sunday with Chris' help, and his sweet air saw. A lot like a Sawzall, but lighter. We got a good chunk of the tire well out, but stopped when we couldn't figure out how to get the battery box in without cutting the cross member that's in the way. There is a way, I just haven't figured it out yet.

Hopefully the good folks at ElectroAuto, where the kit is from, can provide some guidance.


Today I stopped by Underground VW (which seems like a great place, for anyone in Austin needing VW work done) for some help putting my CV joint back together. One of the balls dropped out when I separated it from the tranny, and I could not for the life of me get it back together. Turning the Cabriolet into an EV came up and lo and behold, the guy who just put my CV joint back together is in process of converting a 59 Renault Dauphine! How cool! Check some out at the new and improved EVAlbum.


I also picked my resurfaced and lightened flywheel, no need for it to be heavy anymore without the engine.

The whole family got involved painting the front battery rack with acid proof battery box paint, which will hopefully do a good job keeping the rack rust free long term.

I also got the last bit of the exhaust pipe out, almost done ripping the ICE stuff out!

Thursday, April 27, 2006

The clutch and pressure plate are off the engine!

It's been a while since an update. I've been spending the time cleaning the rust off of the battery boxes. An angle grinder with a wire wheel took care of the big chunks and a $13 Home Despot sand blaster took care of the nooks and crannies. (Thanks for the REAL compressor Jeremy)A little more cleanup and it'll be time to repaint. I just received a can of acid resistant battery box paint which will hopefully keep the rust from starting again.

Now with the clutch off, the EV officially starts to go back together. Woohoo! I started reassmbling the pressure plate assembly to ElectroAuto's nifty taperlock hub, but need to make a run for the right size bolt tommorow. The tear down was fun, but putting the Cabriolet back together is even better. Speaking of which, we've been having such great weather recently, barring the hail storms, that I've really been missing the convertible. Hopefully it'll be back on the road soon. Sorry about the lack of pictures, my camera's hiding from me.

As an aside I came across Terrapass today. They are a company which buys carbon credits with the buying power of a large company, and resells them to anyone interested. This lets anyone buy carbon credits at a reasonable rate, pretty cool.

Erik

Saturday, April 08, 2006

Piece by piece

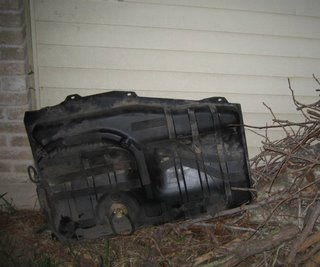
The gas tank is out! From everything I'd read about dropping the gas tank the worst part was loosening the rusty bolts which held up the rear axle beam. Mine weren't rusty and popped right off, what a breeze this would be! Riiiight, I must have forgotten this was a VW. The blessing and curse of this body style of VWs is that they are so similar. Golf, Cabriolet and, Scirocco were all very similar between the late 70's and early 90's so there are a lot of common parts, but there are also a lot of subtle differences. Mine had a piece welded in that looked like it was meant to stay that didn't let the axle drop as far as it wanted to. A couple of hours of tugging and bending the corners and it came out.


And with it the fuel filler neck:


Timely revelation of the day: the cabby was supposed to use 91 octane gas. It was on the sticker I had to peel off to get the filler neck out. Oops. Hasn't seen that as long as I've had it.

When I was last driving the car I made sure to get the fuel gauge as far in the red as I could. This didn't burn up all the gas, but it was pretty close. I considered idling it until it ran out of gas, but didn't think that was sensible given that the end result of this conversion should save gas. Another option would have been to short the fuel pump relay and use the fuel pump to drain the tank. I opted to smell the fumes and drain it at the end. I'd recommend one of the first two if you have a gas tank that is a pain to get at like mine.

This wasp family chose an out of the way place for a nest. In case you can't tell, that is under the backseat, under a cover that goes to the fuel tank!


Last Saturday I also got most of the exhaust out. Exhaust pipe is tough! My hacksaw wasn't up to the job and ended up toothless, and being near the fuel tank I didn't like any of the more fun options like Chris' plasma cutter or an acetylene torch. A dremel with a cutoff wheel ended up doing the trick.