The making of an all electric EV VW Cabriolet

This blog follows my process of converting a 1992 VW Cabriolet to an electric vehicle. As an EV it is quiet, dependable and has plenty of pep and range to get around town.

Thursday, April 27, 2006

The clutch and pressure plate are off the engine!

It's been a while since an update. I've been spending the time cleaning the rust off of the battery boxes. An angle grinder with a wire wheel took care of the big chunks and a $13 Home Despot sand blaster took care of the nooks and crannies. (Thanks for the REAL compressor Jeremy)A little more cleanup and it'll be time to repaint. I just received a can of acid resistant battery box paint which will hopefully keep the rust from starting again.

Now with the clutch off, the EV officially starts to go back together. Woohoo! I started reassmbling the pressure plate assembly to ElectroAuto's nifty taperlock hub, but need to make a run for the right size bolt tommorow. The tear down was fun, but putting the Cabriolet back together is even better. Speaking of which, we've been having such great weather recently, barring the hail storms, that I've really been missing the convertible. Hopefully it'll be back on the road soon. Sorry about the lack of pictures, my camera's hiding from me.

As an aside I came across Terrapass today. They are a company which buys carbon credits with the buying power of a large company, and resells them to anyone interested. This lets anyone buy carbon credits at a reasonable rate, pretty cool.

Erik
Saturday, April 08, 2006

Piece by piece

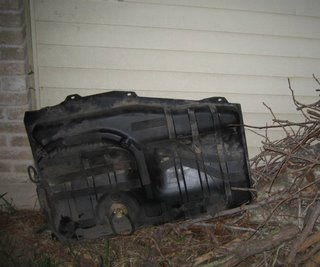
The gas tank is out! From everything I'd read about dropping the gas tank the worst part was loosening the rusty bolts which held up the rear axle beam. Mine weren't rusty and popped right off, what a breeze this would be! Riiiight, I must have forgotten this was a VW. The blessing and curse of this body style of VWs is that they are so similar. Golf, Cabriolet and, Scirocco were all very similar between the late 70's and early 90's so there are a lot of common parts, but there are also a lot of subtle differences. Mine had a piece welded in that looked like it was meant to stay that didn't let the axle drop as far as it wanted to. A couple of hours of tugging and bending the corners and it came out.


And with it the fuel filler neck:


Timely revelation of the day: the cabby was supposed to use 91 octane gas. It was on the sticker I had to peel off to get the filler neck out. Oops. Hasn't seen that as long as I've had it.

When I was last driving the car I made sure to get the fuel gauge as far in the red as I could. This didn't burn up all the gas, but it was pretty close. I considered idling it until it ran out of gas, but didn't think that was sensible given that the end result of this conversion should save gas. Another option would have been to short the fuel pump relay and use the fuel pump to drain the tank. I opted to smell the fumes and drain it at the end. I'd recommend one of the first two if you have a gas tank that is a pain to get at like mine.

This wasp family chose an out of the way place for a nest. In case you can't tell, that is under the backseat, under a cover that goes to the fuel tank!


Last Saturday I also got most of the exhaust out. Exhaust pipe is tough! My hacksaw wasn't up to the job and ended up toothless, and being near the fuel tank I didn't like any of the more fun options like Chris' plasma cutter or an acetylene torch. A dremel with a cutoff wheel ended up doing the trick.